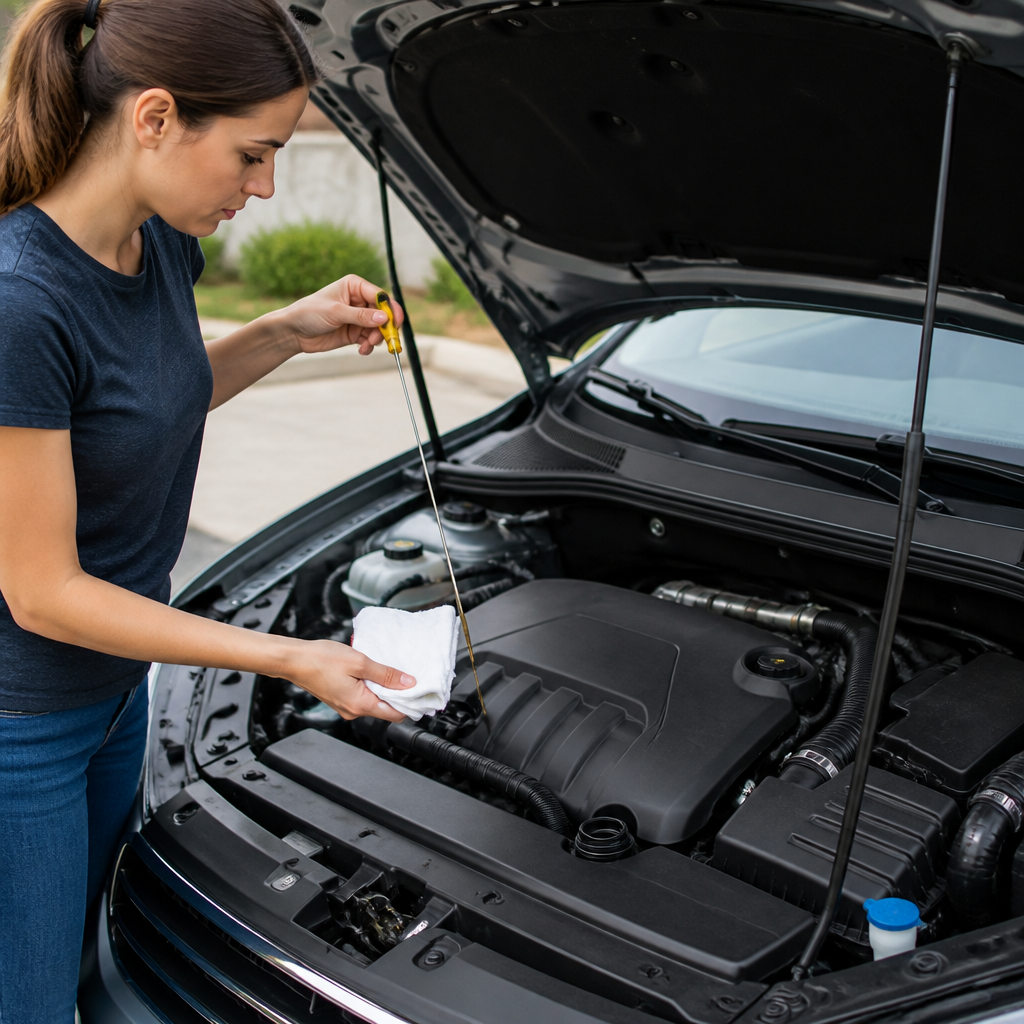
Learning how to check engine oil level correctly is one of the simplest ways to protect your vehicle. A proper check can reveal low oil, overfilling, leaks, or signs that the engine needs attention before a small problem becomes expensive damage.
Most drivers can complete the inspection in a few minutes. However, the result depends on more than pulling out the dipstick and looking at it. The vehicle must be parked safely, the engine should be at the right temperature, and the dipstick must be cleaned and read correctly.
This guide explains the process step by step. It also covers vehicles without traditional dipsticks, oil warning lights, oil colour, common mistakes, and situations where you should stop driving and seek professional help. Check Engine Light: What It Means and What to Do
Why checking engine oil matters
Engine oil lubricates moving parts inside the engine. It helps reduce friction between components such as pistons, bearings, camshafts, and crankshafts. It also helps carry heat away from internal parts and suspends some dirt and combustion by-products until the oil filter can remove them.
When the oil level becomes too low, the engine may not receive enough lubrication. Some parts can then wear more quickly, especially during acceleration, heavy traffic, long journeys, or hot weather. In severe cases, low oil can contribute to serious engine failure.
Too much oil can also cause trouble. An overfilled engine may churn the oil into foam. Foamy oil does not lubricate in the same way as a properly settled oil supply. Excess oil may also contribute to leaks, smoke, or damage to emissions-control components, depending on the vehicle.
Regular checks are especially useful when:
- You own an older vehicle.
- Your vehicle has a history of oil consumption.
- You notice oil spots under the car.
- You are preparing for a long trip.
- The oil warning light has appeared.
- The engine has recently been serviced or repaired.
- You have bought a used vehicle and do not know its maintenance history.
Checking the level does not replace scheduled servicing. Oil still needs to be changed according to the vehicle manufacturer’s guidance, even if the level appears normal.
What you need before starting
You do not need special equipment for a basic inspection. Prepare the following items:
- The vehicle owner’s manual.
- A clean, lint-free cloth or paper towel.
- The correct engine oil for your vehicle, if topping up is necessary.
- A funnel, if available.
- Gloves, especially if the engine or oil may be warm.
The owner’s manual is important because dipstick markings, oil specifications, and checking instructions vary between vehicles. Some engines require the oil to be checked when cold. Others require a short wait after switching off a warm engine.
Do not choose oil only by its brand or by the number printed on another vehicle’s container. Check the viscosity and specification required for your engine. Modern engines may require a particular standard for turbocharger protection, emissions systems, fuel economy, or extended service intervals.
How to check engine oil level correctly
The following method applies to many vehicles with a conventional dipstick. Always give priority to your owner’s manual if it gives different instructions.
1. Park on level ground
Move the vehicle onto a flat, stable surface. A sloping driveway can make the oil collect toward one side of the sump. This may produce a reading that appears higher or lower than the actual level.
Apply the parking brake firmly. If the engine is running, place the transmission in park for an automatic vehicle or neutral for a manual vehicle, following the manufacturer’s safety instructions. Switch the engine off before opening the bonnet.
Avoid checking beside moving traffic or on unstable ground. If you need to raise the vehicle for any other reason, use proper jack stands. Never crawl beneath a vehicle supported only by a jack.
2. Let the oil settle
Oil needs time to drain from the upper parts of the engine back into the sump. If you check immediately after switching off, some oil may still be circulating or sitting in the cylinder head. The dipstick could then show a lower level than the engine actually has.
Many manufacturers recommend waiting a few minutes after switching off a warm engine. Some specify checking when the engine is cold, often before the first start of the day. Because procedures differ, follow the manual where possible.
If the engine is very hot, take care around the bonnet, exhaust components, and other hot surfaces. You can wait longer until the engine has cooled enough to handle the inspection safely.
3. Locate the dipstick
Open the bonnet and secure it properly. Look for a brightly coloured handle, often marked with an oil symbol or the word oil. The dipstick may sit toward the front or side of the engine, although its position differs between models.
Do not confuse the engine oil dipstick with the transmission fluid dipstick. They may look similar, but they measure different fluids. If you cannot identify the correct dipstick, consult the owner’s manual rather than guessing.
Some vehicles do not have a dipstick. Instead, the dashboard or infotainment system displays the oil level after the car follows a particular measurement routine. The manual should explain how to access this function and whether the engine must be warm, cold, running, or switched off.
4. Remove and wipe the dipstick
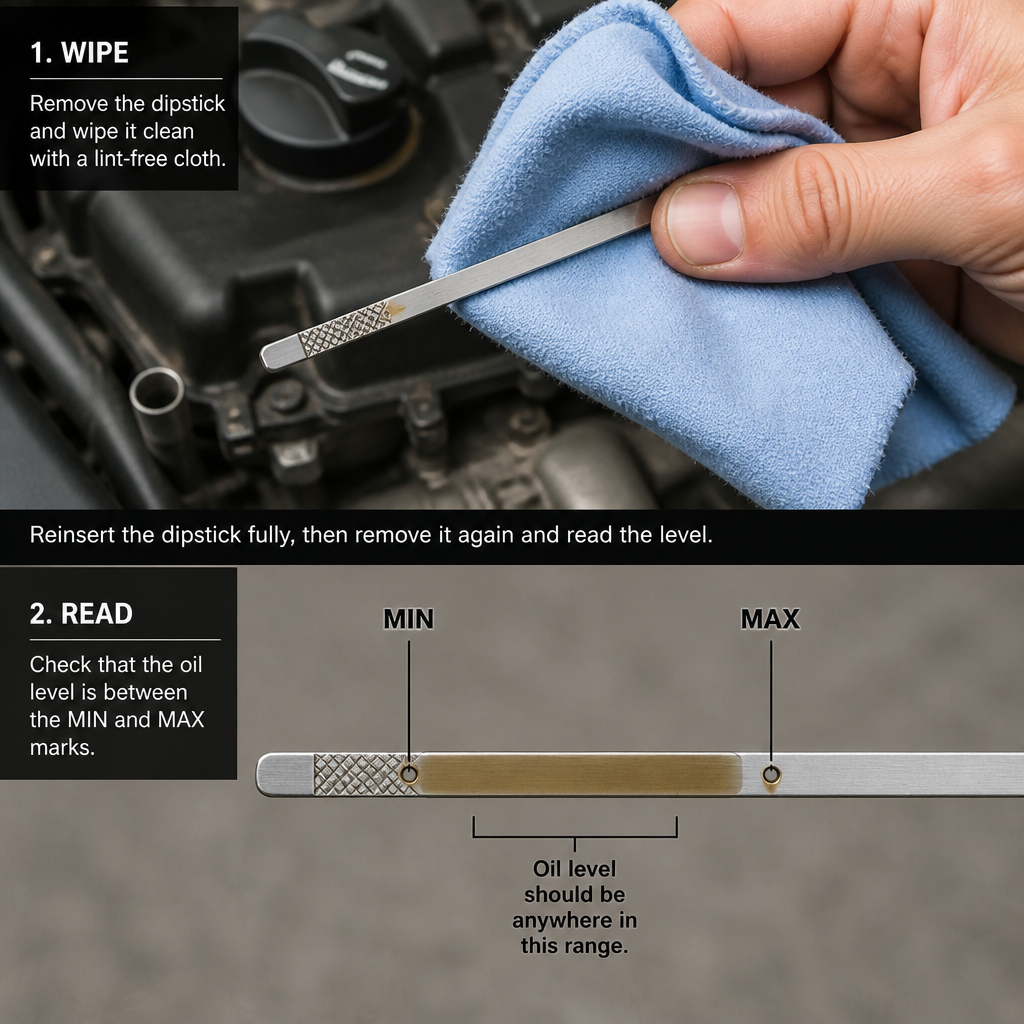
Pull the dipstick out carefully. Use a clean cloth or paper towel to wipe the entire measuring section. The first reading can be unreliable because oil may have splashed along the stick while the engine was running.
Look at the dipstick before wiping it. You may notice metal particles, coolant-like residue, or an unusual colour. These signs do not always provide a diagnosis, but they can tell you that further inspection may be worthwhile.
5. Reinsert the dipstick fully
Push the clean dipstick back into its tube until it is fully seated. This step matters because an incompletely inserted dipstick can allow oil to spread higher on the measuring area. The resulting reading may look falsely high.
Wait a moment, then remove it again. Keep the dipstick as level as possible so oil does not run along the stick and create confusion.
6. Read the markings
Look for two marks, holes, lines, or labelled areas. They may be marked MIN and MAX, or LOW and FULL. The oil film should normally sit between these marks. Car AC Not Cooling: 10 Possible Causes and What to Check
Hold the dipstick horizontally or slightly downward in good light. Check both sides if the oil appears uneven. A clear, consistent film between the marks gives you a more reliable reading than a thin smear at one edge.
If the oil is at or just above the minimum mark, the engine may need a top-up. However, do not assume that the distance between the marks always equals one litre. The capacity varies by engine, so check the manual or service information before adding oil.
7. Add oil only when necessary
If the level is below the minimum mark, add the correct oil gradually. Remove the oil filler cap, place a funnel in the opening if you have one, and pour a small amount. Then wait briefly and repeat the measurement.
Adding a large quantity at once creates a risk of overfilling. A small amount can move the level significantly, particularly in engines with a narrow range between the marks. Measure after each addition.
Keep the oil filler cap and surrounding area clean. Dirt that falls into the filler opening can enter the engine. After topping up, secure the cap and replace the dipstick fully.
8. Recheck the final level
After adding oil, allow it to drain into the sump. Then wipe and reinsert the dipstick again. The final level should remain between the minimum and maximum marks, preferably without exceeding the maximum line.
Do not try to make the level higher than the maximum mark. More oil does not provide extra protection. If you accidentally overfill the engine, contact a qualified technician for advice. The excess may need to be drained.
How to interpret the dipstick reading
A dipstick gives more information than a simple full-or-empty result. Read the level, appearance, smell, and texture together. One observation alone may not identify the cause of a problem.
Oil between the minimum and maximum marks
This usually indicates that the quantity is within the manufacturer’s operating range. You should still inspect for leaks and monitor the level periodically. A vehicle can lose oil gradually while remaining between the marks for some time.
If the level drops noticeably between checks, record how much you add and how far you drive. This information can help a technician assess possible leaks or internal oil consumption.
Oil at the minimum mark
The engine may still have oil, but the level is at the lower limit. Check the manual and add the correct oil if appropriate. Avoid waiting until the dipstick is completely dry.
After topping up, look under the vehicle for fresh oil. Also inspect around the oil filter, drain plug, valve cover, and other visible areas. Some leaks appear only when the engine is running or when the oil is warm.
No oil appears on the dipstick
This is a serious warning. First, make sure you parked on level ground and inserted the dipstick fully. Wipe it, reinsert it, and take another reading.
If it remains dry, do not continue driving as though nothing is wrong. Add the correct oil only if you know the proper amount and specification, then arrange an inspection. If the oil warning light is on, the engine is making loud noises, or oil is visibly leaking, switch the engine off and seek assistance.
Oil above the maximum mark
Overfilling should not be ignored. A small reading difference can sometimes result from checking under different conditions, such as immediately after shutdown versus after a longer drain-down period. Recheck using the correct procedure.
If the level is clearly above the maximum mark, avoid driving unnecessarily. A workshop can remove the excess safely. Do not rely on the idea that the engine will simply burn off the extra oil.
What engine oil colour and texture can tell you
Oil colour changes with use. Fresh oil may look amber or golden, while used oil often becomes darker. Dark oil does not automatically mean the engine is damaged or that the oil has failed. Some engines darken oil quickly because the oil holds combustion deposits in suspension.
Colour should be considered alongside the service schedule, mileage, engine type, and the oil’s texture. A normal used-oil film should generally look smooth rather than gritty.
Seek professional advice if you notice:
- Visible metal flakes or glitter-like particles.
- A thick, gritty, or unusually sludgy deposit.
- A strong fuel smell in the oil.
- A creamy or mayonnaise-like substance under the filler cap or on the dipstick.
- An oil level that rises without adding oil.
- Oil that appears unusually thin or watery.
Short trips and condensation can sometimes create light residue under the filler cap, especially in certain conditions. However, creamy deposits combined with coolant loss, overheating, or persistent white exhaust smoke require prompt inspection because they may indicate coolant contamination.
Do not diagnose an internal engine fault from colour alone. A technician may need to inspect the cooling system, perform testing, or analyse an oil sample. How to Check an Accident-Damaged Car Before You Buy
How often should you check the oil?
There is no single schedule that suits every vehicle. A practical approach is to check the oil regularly and increase the frequency when the engine is older, the vehicle travels long distances, or the manufacturer identifies a risk of oil consumption.
Consider checking before a long journey, after purchasing a used car, and whenever the vehicle displays an oil-related warning. Some drivers check weekly, while others follow a less frequent routine based on the vehicle’s condition and use.
Frequent checking is particularly sensible after:
- An oil and filter change.
- Engine repair work.
- A long period of storage.
- Driving in heavy traffic or very dusty conditions.
- Towing or carrying heavy loads.
- Noticeable changes in engine noise or performance.
Keep a simple record of the date, odometer reading, oil level, and amount added. A pattern is easier to identify when you write it down. For example, needing a small top-up once between services may be different from losing the same amount every few hundred kilometres.
Common mistakes when checking engine oil
Even a straightforward inspection can produce a misleading result if the process is rushed. Avoid these common errors.
Checking on a slope
A sloping surface changes how oil sits in the sump. Park on level ground whenever possible. If you cannot, treat the reading as uncertain and check again in a safer location.
Reading immediately after switching off
Oil may not have drained back into the sump. Follow the recommended waiting period instead. If the manual specifies a cold check, measure before starting the engine.
Failing to wipe the dipstick
The first pull can leave oil along the tube or measuring section. Always clean the dipstick before taking the reading that you use to make a decision.
Adding oil without measuring
Guessing can turn a low level into an overfilled level. Add small amounts, wait, and recheck.
Using the wrong oil
Oil that looks similar may not meet the engine’s required specification. Use the manual or a trusted parts supplier to identify the correct product.
Checking only once
If the result seems unusual, repeat the procedure. A second reading can reveal that the dipstick was not fully inserted or that the vehicle was not level.
Ignoring warning lights
The oil pressure warning light is not simply a reminder to top up. It can indicate that the engine is not maintaining adequate oil pressure. If it stays on while the engine runs, switch the engine off as soon as it is safe and obtain professional help.
Oil level checks in vehicles without a dipstick
Some modern vehicles use an electronic oil-level sensor instead of a traditional dipstick. The measurement may appear in the instrument cluster, a vehicle settings menu, or an infotainment screen.
These systems often require a specific sequence. The vehicle may need to be parked on level ground, warmed to a particular temperature, and left switched off for a set period. Other systems measure while the engine runs. Follow the instructions for that model.
If the electronic system reports an implausible result, do not keep adding oil based on guesswork. A faulty sensor, wiring problem, incorrect measurement conditions, or an actual oil-level issue could produce a warning. A workshop can confirm the level and test the system.
What to do if your vehicle keeps losing oil
Regular top-ups may hide an underlying fault. If the oil level repeatedly falls, the engine may be leaking oil externally, burning it internally, or losing it through a ventilation or turbocharger-related problem.
Look for fresh oil beneath the vehicle after it has been parked. Check for wet areas around the engine, oil filter, drain plug, and visible seals. Remember that airflow can spread oil away from its original leak point.
Blue or blue-grey exhaust smoke can suggest that the engine is burning oil, although smoke colour can be difficult to judge in changing light. A burning-oil smell, oily residue around the exhaust, poor performance, or repeated low-level warnings also deserves inspection.
Do not wait for the engine to become noisy. Continued driving with low oil can increase damage and make the repair more expensive. Record the oil used and the amount added, then share those details with the technician.
Safety precautions during an oil check
Engine bays contain hot, moving, and electrical components. Work carefully. How to Reduce Fuel Consumption in Your Car
- Switch the engine off before placing your hands near the engine bay.
- Keep loose clothing, jewellery, hair, and tools away from belts and fans.
- Use gloves if the engine or oil is warm.
- Do not touch hot exhaust components.
- Keep oil away from children and pets.
- Clean spills promptly because oil creates a slipping hazard.
- Do not pour used oil onto soil, drains, or roadside surfaces.
Used engine oil should be stored in a sealed container and taken to an appropriate collection point, service centre, or recycling facility where available. Local disposal arrangements differ, so follow the instructions provided by the relevant facility.
How to check oil after an oil change
Checking the level after an oil change is good practice. A service technician normally fills the engine, but the final level can change after the engine runs and the new oil reaches the filter and passages.
Start the engine only as directed, then switch it off and wait according to the vehicle’s procedure. Inspect the dipstick and look for leaks around the filter and drain plug. The level should be within the marked range.
If the level is too high or too low after a service, return to the service provider before driving far. Keep the invoice or service record because it identifies the oil specification and work completed.
When to ask a professional for help
A basic oil check is suitable for many drivers, but some situations need expert attention. Contact a qualified technician if:
- The oil warning light remains illuminated.
- The engine makes knocking, ticking, grinding, or other new noises.
- The dipstick is dry after a correct reading.
- The oil level falls rapidly.
- The oil level rises without a top-up.
- You find metal particles in the oil.
- The engine overheats.
- You see a large oil leak.
- You are unsure which oil the engine requires.
- The vehicle uses an electronic oil measurement system that is not working correctly.
If a warning light appears while driving, avoid continuing simply because the engine still sounds normal. Some damage can develop before the driver notices a change in sound or performance.
Frequently asked questions
Should I check the oil when the engine is hot or cold?
It depends on the vehicle. Some manufacturers specify a cold check, while others require a warm engine followed by a short waiting period. The owner’s manual provides the most reliable instruction for your model.
Can I check the oil while the engine is running?
Most conventional dipstick checks should be performed with the engine switched off. Oil can splash, moving components can cause injury, and the reading may be inaccurate while the engine is running. Follow the manual for vehicles with electronic systems that require a running engine.
Is dark engine oil bad?
Not necessarily. Used oil commonly becomes darker as it collects deposits. Texture, smell, service history, oil pressure, and oil consumption provide more useful clues than colour alone.
How much oil should I add when the level is low?
Add a small amount at a time and recheck the dipstick. Do not assume that the gap between the minimum and maximum marks equals a fixed quantity for every vehicle. Use the owner’s manual for the engine’s capacity and measurement procedure.
Can I mix different engine oil brands?
Oil should meet the correct viscosity and specification. In an emergency, using a compatible oil may be preferable to running dangerously low, but avoid mixing products routinely without confirming compatibility. Ask a qualified technician if you are uncertain.
What if I accidentally overfill the engine?
Do not rely on the engine to burn off the excess. Recheck the level using the correct procedure. If it remains above the maximum mark, have the excess removed by a qualified technician, especially if the overfill is substantial.
Why does the oil level look different on each side of the dipstick?
Oil can smear against the tube as the dipstick is removed. Wipe it clean, reinsert it fully, and check both sides in good light. If the result remains unclear, repeat the check after the oil has settled longer.
Does checking the oil replace an oil change?
No. A level check shows how much oil is present, not whether it has reached the end of its useful service life. Follow the manufacturer’s oil-change schedule and use the specified filter and lubricant.
A simple routine for better engine care
A consistent routine makes it easier to spot changes early. Park on level ground, allow the oil to settle, clean the dipstick, take a careful reading, and record anything unusual. If you add oil, note the amount and date.
Combine the inspection with other basic checks, such as tyre pressure, coolant level, windscreen washer fluid, and visible leaks. These checks do not replace professional servicing, but they help you notice developing problems sooner.
Remember that the best way to check engine oil level is the method specified for your particular vehicle. Correct timing, a level surface, a clean dipstick, and the right oil will give you a more dependable result.
When the level is normal, continue following the service schedule. When it is low, top up carefully and investigate why. When the reading is abnormal or accompanied by warning lights, unusual noise, smoke, or leaks, stop treating it as a routine top-up and arrange professional assistance.
3 thoughts on “How to Check Engine Oil Level Correctly”