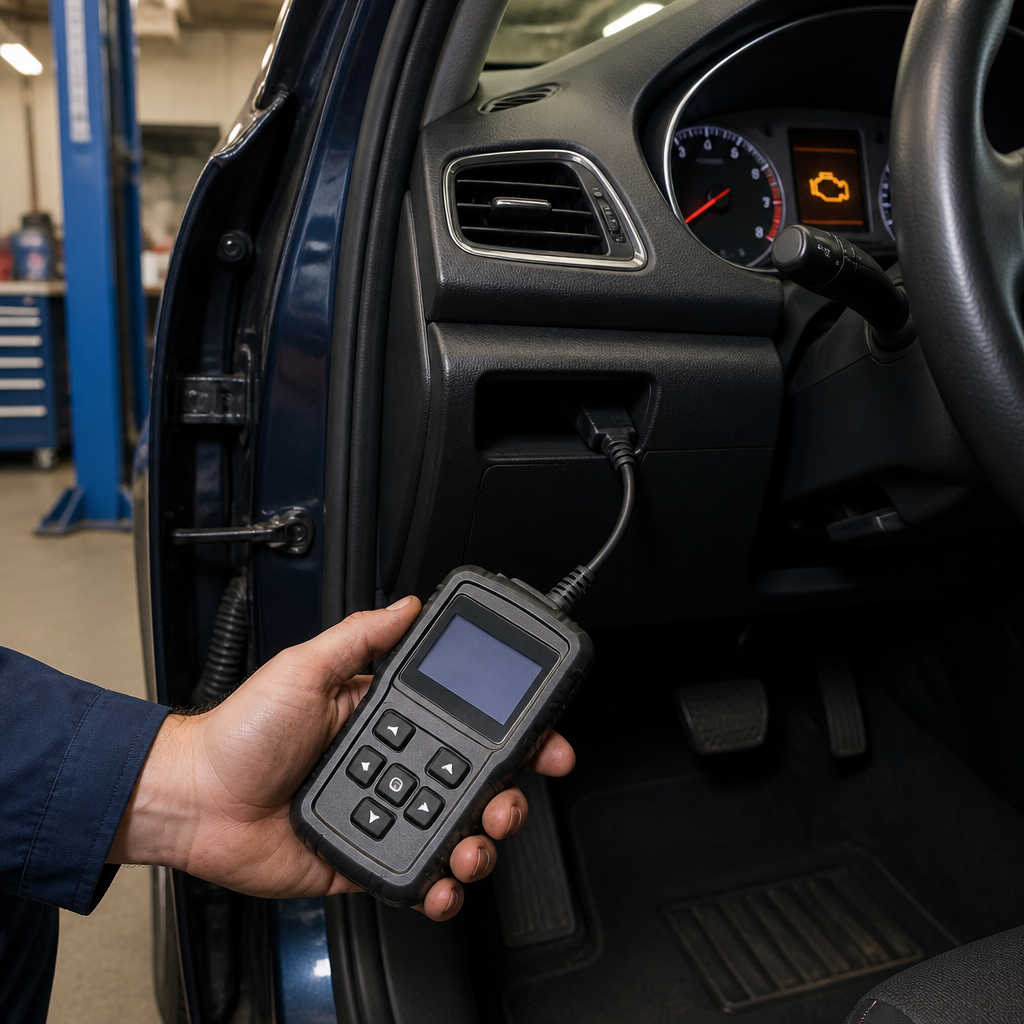
Learning how to use an OBD2 scanner can help you understand why a check engine light is on before you spend money on repairs. The tool connects to your vehicle, retrieves diagnostic trouble codes, and may display live information from sensors while the engine runs. However, a code is a starting point, not a complete diagnosis. This guide explains how to scan a vehicle safely, interpret the results, test likely causes, and decide when you need a qualified technician.
Modern vehicles monitor many systems through onboard computers. When a monitored value falls outside an expected range, the vehicle may store a fault code and illuminate the malfunction indicator lamp. The code can point toward an engine, emissions, transmission, or electrical problem. It does not automatically identify the failed part.
With a careful process, an OBD2 scanner becomes more useful than a simple code reader. You can record the vehicle symptoms, check the code conditions, inspect basic components, and confirm whether a repair has solved the problem. You can also avoid replacing expensive parts based only on a guess. How to Avoid Scams When Buying a Car Online in Nigeria
What an OBD2 scanner does
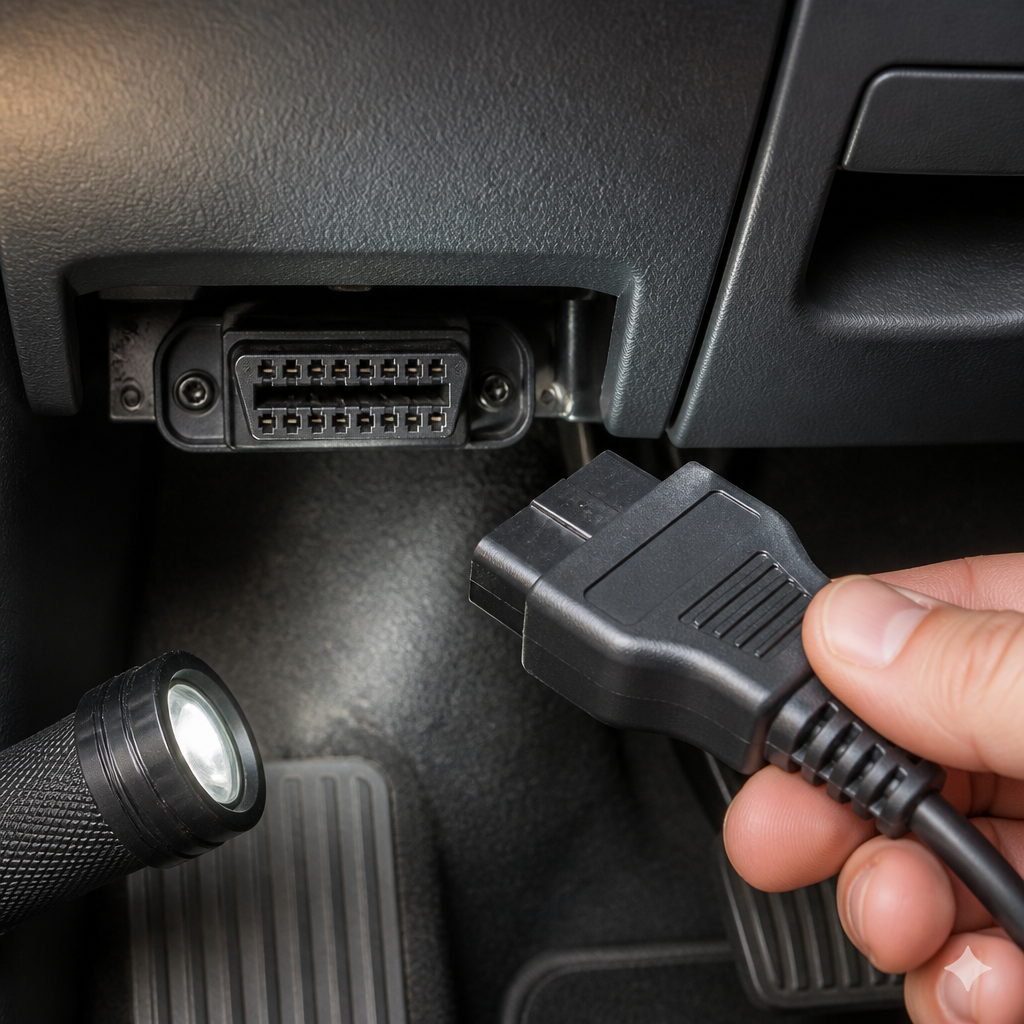
An OBD2 scanner communicates with the vehicle’s diagnostic system through a standard diagnostic connector. In many cars, this connector is beneath the dashboard near the steering column. Some vehicles place it slightly higher, lower, or behind a small trim panel.
Depending on the model, the scanner may retrieve several types of information:
- Stored codes: faults recorded during an earlier drive cycle or operating condition.
- Pending codes: possible faults that have been detected but may not yet meet the conditions for a warning light.
- Permanent codes: emissions-related information that may remain until the vehicle confirms that a problem has been repaired.
- Live data: changing values from sensors and control systems while the ignition is on or the engine is running.
- Freeze-frame data: a snapshot of selected readings from the moment a fault was recorded.
- Readiness monitor status: information showing whether certain self-checks have completed.
Basic readers usually show and clear codes. More advanced tools can display manufacturer-specific information, perform system tests, graph sensor readings, or communicate with several control modules. A low-cost device can be useful for an initial check, but its capabilities vary widely.
OBD2 mainly concerns systems that affect emissions and vehicle operation. It may not identify every mechanical, body, air-conditioning, safety, or convenience-system problem. An engine may have a serious issue without storing a code, especially when the fault is mechanical rather than electronic.
Before you connect the scanner
Start with the symptoms, not the scanner. Write down what the vehicle is doing and when it happens. Useful details include whether the engine starts normally, whether it shakes at idle, whether fuel consumption has changed, and whether the problem appears during acceleration, braking, or cold starts.
Also note every warning light. A flashing check engine light deserves more urgency than a steady light. A flashing light can indicate a misfire that may damage the catalytic converter if you continue driving. If the vehicle runs roughly, loses power, overheats, produces smoke, or has low oil pressure, stop when it is safe and seek professional help.
Check simple conditions before scanning:
- Confirm that the fuel filler cap is fitted correctly, if the vehicle uses a removable cap.
- Check the engine oil level and coolant level when the engine is cold and parked safely.
- Look for loose electrical connectors, damaged wiring, split hoses, or obvious fluid leaks.
- Make sure the battery is not severely discharged.
- Read the scanner instructions and confirm that it supports the vehicle.
Do not connect or disconnect a scanner while driving. Keep the tool and cable away from pedals, belts, fans, and hot surfaces. If you use a wireless adapter, secure your phone and avoid interacting with the application while the vehicle is moving.
Check the vehicle and scanner compatibility
Many passenger vehicles sold in different markets use OBD2-compatible diagnostic communication, but compatibility still depends on the vehicle’s year, market, connector, and control modules. Some older vehicles use different systems or proprietary connections. Always check the scanner maker’s compatibility information before buying or borrowing a device.
A standard connector does not guarantee that every scanner function will work. A basic scanner may access engine and emissions codes but not the automatic transmission, airbag, ABS, or body control module. If your warning concerns one of those systems, you may need a tool that explicitly supports that module.
How to use an OBD2 scanner safely
Once the vehicle is parked, the process is straightforward. Follow these steps in order and record the information before clearing anything.
1. Park and prepare the vehicle
Park on a stable surface away from traffic. Apply the parking brake and place an automatic transmission in Park or a manual transmission in neutral. Switch off accessories such as the radio and air conditioner. If the engine must run for live-data testing, keep the area well ventilated and never run the engine inside an enclosed garage.
Locate the diagnostic connector. Use a flashlight if necessary, but do not force the plug. Inspect the connector for bent pins, moisture, dirt, or damage. A poor connection can prevent communication or produce unreliable results.
2. Connect the scanner
Plug the scanner into the diagnostic connector with the ignition switched off unless the instructions specify another sequence. Turn the ignition to the on position without starting the engine. On a push-button vehicle, this may require pressing the button without pressing the brake or clutch, depending on the manufacturer’s instructions.
The scanner may power up immediately. If it does not, check the connector and vehicle power. Some diagnostic connectors receive power through a fuse. Do not replace a fuse with one of a higher rating. If the connector has no power, the vehicle may have an electrical fault that needs testing.
3. Select the diagnostic function
Choose a function such as Read Codes, Scan, or Diagnostics. Some scanners ask for the vehicle identification number or request the make, model, engine, and year. Enter these details carefully. Choosing the wrong vehicle profile can limit communication or display incomplete information. How to Obtain a Roadworthiness Certificate in Nigeria
Allow the scanner time to communicate with the control module. Do not switch the ignition off or unplug the tool during a scan unless the instructions tell you to do so. If communication fails, note the exact message. Possible causes include low battery voltage, an incompatible tool, a damaged connector, or a problem with the vehicle’s communication network.
4. Read and save every code
Record the complete code, including its letter and numbers. A code such as P0301 is more useful than a note saying engine fault. Take a photograph of the scanner screen if that is practical. Save the code description, freeze-frame data, and whether the code is stored, pending, or permanent.
Do not clear the codes yet. Clearing them can erase valuable information and reset emissions readiness monitors. If you need to show the results to a repair shop, the original data may help the technician reproduce the problem.
5. Review freeze-frame information
Freeze-frame data can show the conditions present when the vehicle stored the fault. Depending on the vehicle and scanner, this may include engine speed, coolant temperature, vehicle speed, fuel-trim values, and engine load. Compare the data with the symptoms.
For example, a fault recorded during a cold start may suggest a different testing direction from one recorded at high engine speed under load. Freeze-frame data does not prove the cause, but it can tell you when to look for the problem.
6. Check pending and permanent codes
Pending codes can reveal a developing issue before the warning light becomes steady. They may also appear after a single unusual reading. Treat them as evidence that requires confirmation, not as proof that a component has failed.
Permanent codes require particular care. Clearing the code does not necessarily remove it. The vehicle generally needs to complete its own checks and confirm that the fault is no longer present. A permanent code can remain even after a successful repair, so follow-up testing matters.
7. Write down the results
Create a simple record with the date, mileage, warning lights, symptoms, codes, freeze-frame details, and any recent work. Include whether the engine was hot or cold. This record helps you compare results after an inspection or repair.
How to interpret OBD2 scanner codes
Most diagnostic codes begin with a letter. The first character usually identifies the system area:
- P: powertrain, including engine and transmission functions.
- B: body-related systems.
- C: chassis systems.
- U: communication between control modules.
The remaining characters provide more information about the code. A code beginning with P0 is generally defined within a common standardized group, while other code ranges may be manufacturer-specific or require vehicle-specific interpretation. The exact meaning can vary by model and engine.
Consider a code that refers to an oxygen sensor circuit. It may result from a failed sensor, damaged wiring, an exhaust leak, a poor electrical connection, or a fuel mixture problem that makes the sensor reading appear abnormal. Replacing the sensor immediately may not solve the problem.
Similarly, a misfire code identifies a cylinder or misfire condition. It does not automatically prove that the ignition coil is defective. A worn spark plug, injector problem, vacuum leak, low compression, incorrect valve timing, or wiring fault can produce a similar symptom.
Use the code as a direction for testing. Ask three questions:
- What system does the code identify?
- What other faults can create the same reading?
- What test can separate those possibilities?
Reliable code references should match the vehicle’s make, model, engine, and year. Generic descriptions are useful for orientation, but manufacturer service information provides better diagnostic steps and expected values.
Using live data without misreading it
Live data shows what the vehicle’s sensors and control modules report in real time. It can be valuable, but it is easy to misinterpret. A number that looks unusual at idle may be normal under a different engine temperature or load. Compare readings with the service information for the vehicle whenever possible.
Common data items include: How to Prepare Your Car for Inspection by a Potential Buyer
- Engine coolant temperature: helps show whether the engine has reached operating temperature and whether the reading is plausible.
- Engine speed: confirms the reported rpm and can help identify unstable idle conditions.
- Throttle position: shows throttle input or electronically calculated throttle opening.
- Manifold pressure or airflow: helps describe the engine’s air demand.
- Oxygen and air-fuel sensor readings: provide information about exhaust oxygen or mixture control.
- Short-term and long-term fuel trim: show how the control system is adjusting fueling.
- Vehicle speed: useful when checking speed-related faults.
- Battery or control-module voltage: may reveal low supply voltage, although a proper electrical test is still necessary.
Look for patterns rather than one isolated value. Fuel-trim readings that remain strongly positive may suggest that the engine is adding fuel because it detects a lean condition. Possible causes include an intake leak, insufficient fuel delivery, or inaccurate airflow information. Strongly negative correction may point toward excess fuel, inaccurate sensor data, or a fuel-pressure problem. These are diagnostic clues, not final conclusions.
When comparing live data, record the engine temperature and operating condition. Compare idle readings with readings at a steady higher speed if the scanner and vehicle allow safe testing. Avoid revving the engine in an unsafe location, and never place yourself near exposed moving parts.
Why sensor data can mislead you
A scanner displays what a control module receives or calculates. It does not independently verify that a sensor is physically accurate. A sensor may report a plausible but incorrect value. Wiring resistance, poor grounds, damaged connectors, air leaks, and low system voltage can also distort the data.
For that reason, confirm electronic readings with physical tests. A multimeter, fuel-pressure gauge, vacuum test, smoke test, compression test, or oscilloscope may be necessary. Use the correct procedure for the vehicle. Guessing at terminals can damage a control module.
Common diagnostic examples
Example: an evaporative-emissions leak code
A fuel-system leak code may be caused by a loose or damaged fuel cap, a split hose, a leaking valve, a damaged canister, or a small leak that requires specialised equipment to locate. Start with a visual inspection and confirm that the cap seals correctly. If the code returns, further testing may require a smoke machine and manufacturer-specific procedures.
Example: a random or cylinder-specific misfire
First, note whether the engine runs roughly and whether the light flashes. Inspect service items such as spark plugs if they are due for replacement, but do not assume they are the cause. A technician may swap a coil or injector between cylinders as a controlled test, provided the procedure is suitable for that vehicle. If the misfire follows the component, the component becomes more suspect. If it stays on the same cylinder, compression, wiring, fuel delivery, or mechanical timing may need attention.
Example: a low-voltage or communication code
Several unrelated warning lights can appear when battery voltage drops or a ground connection becomes poor. Check battery condition, charging voltage, terminals, and grounds with proper equipment. Do not clear all codes and assume the issue is solved. If communication codes return, a wiring-network fault may require advanced testing.
When you should not clear the codes
Clearing codes can be appropriate after you have recorded them and completed a repair. It is not a repair by itself. If you erase the information before investigating, you may lose freeze-frame data and make the fault harder to reproduce.
There is another important reason to avoid unnecessary clearing. Erasing codes usually resets emissions readiness monitors to incomplete. A vehicle may then need several normal driving conditions before the checks finish. If you are preparing for an inspection, confirm the applicable local requirements and avoid relying on a recently cleared system.
Do not disconnect the battery simply to turn off a warning light. This can erase learned settings, reset the clock and radio, create additional issues, or hide the original evidence. It may also leave the vehicle with incomplete self-checks.
After a repair: verify the result
Once the suspected problem has been repaired, inspect the work carefully. Check connectors, hose routing, fasteners, fluid levels, and electrical terminals. Then reconnect the scanner and review the codes. If the repair procedure calls for clearing a code, record the original information first.
Take the vehicle for a safe test drive under conditions related to the original fault. Watch for new symptoms, warning lights, unusual noises, overheating, or loss of power. A short drive may not complete every self-test. The vehicle needs the right combination of temperature, speed, load, and time.
Scan again after the drive. A successful result may mean that the original code does not return, the pending code remains absent, and the relevant monitor eventually completes. It does not mean every possible problem has been ruled out.
If the same code returns, stop replacing parts at random. Review the original evidence and test the circuit or system more deeply. A qualified technician may need wiring diagrams, manufacturer test data, pressure measurements, special tools, or bidirectional controls that a basic scanner cannot provide.
Common mistakes to avoid
- Replacing the part named in the code immediately: the code identifies a monitored condition, not always a failed component.
- Ignoring the vehicle’s symptoms: a code should be interpreted alongside noise, smell, performance, and operating conditions.
- Using an incompatible app or adapter: a connection does not guarantee accurate access to all modules.
- Clearing codes before recording them: this removes useful diagnostic evidence.
- Testing with a weak battery: unstable voltage can create misleading faults.
- Driving with a flashing warning light: continued driving may worsen an engine or emissions problem.
- Working around moving parts: live-data checks with the engine running require safe clothing, positioning, and ventilation.
- Trusting a single live-data number: values must be considered in context and compared with specifications.
- Ignoring non-engine warning lights: ABS, airbag, and transmission faults may need a scanner with broader module coverage.
When to use a professional technician
Use professional help when the vehicle has a flashing check engine light, severe misfire, overheating, smoke, fuel smell, low oil-pressure warning, brake-system warning, or major loss of power. These symptoms can create safety risks or expensive damage. How to Write a Car Sales Advert That Gets Serious Buyers
Professional diagnosis is also sensible when a code returns after a repair, several modules report communication faults, or you need to test fuel pressure, compression, wiring, or network signals. Some faults cannot be confirmed through a generic scanner alone.
When taking the vehicle to a repair shop, bring the code record and describe the exact conditions that trigger the problem. Tell the technician what parts have already been replaced. This information can prevent repeated tests and unnecessary parts replacement.
Buying an OBD2 scanner
Choose a scanner according to the work you expect it to do. A basic reader may suit someone who wants to check a check-engine warning and share the code with a technician. A more advanced tool may be worthwhile if you maintain several vehicles or need access to ABS, airbag, transmission, service, or live-data functions.
Before buying, check:
- Vehicle compatibility for the exact market, model, year, and engine.
- Whether the tool reads only generic powertrain codes or also manufacturer-specific and non-engine modules.
- Whether it displays freeze-frame data, pending codes, readiness monitors, and live data.
- How the tool receives software updates and whether updates involve additional charges.
- Whether the screen, cable, application, and instructions are practical for your needs.
- What support is available if the scanner fails to communicate with a vehicle.
Do not judge a scanner only by the number of codes in its database. A useful diagnostic tool should present information clearly and help you test a fault rather than encourage blind parts replacement.
Frequently asked questions
Can an OBD2 scanner tell me exactly what part is bad?
Usually, no. It identifies a fault condition or system that needs investigation. A code related to a sensor circuit can result from the sensor, wiring, connector, power supply, ground, exhaust leak, or another condition. Testing is needed before replacing a part.
Can I use a scanner while the engine is running?
Many scanners support live data with the engine running. Park safely, keep the tool away from moving and hot components, maintain ventilation, and follow the scanner instructions. Do not operate the device while driving.
Will clearing a code fix the car?
No. Clearing removes stored information and may turn off the warning temporarily. If the underlying fault remains, the code will usually return after the vehicle detects it again.
Why does the check engine light stay off after I clear it?
The vehicle may not have completed the checks that detect the fault. A problem can also be intermittent. Monitor symptoms, review readiness status, and do not assume the issue is permanently repaired just because the light has not returned.
Can a scanner find a dead battery or alternator?
It may show low-voltage information or related codes, but it cannot replace a proper battery and charging-system test. Voltage readings can change with engine speed and electrical load. Use suitable test equipment or ask a technician to verify the system.
Why does the scanner show no codes even though the car has a problem?
Not every problem creates a diagnostic code. Mechanical faults, intermittent problems, body issues, and some module faults may not appear on a basic reader. The scanner may also lack access to the relevant control module. Continue with a visual, electrical, or mechanical inspection.
Can I pass a vehicle inspection after clearing codes?
Not necessarily. Clearing codes can reset readiness monitors, and the vehicle may need suitable driving conditions before they complete. Inspection rules differ by location, so check the applicable official guidance and allow enough time for proper diagnosis.
Final checklist for using an OBD2 scanner
- Record the symptoms and warning lights before connecting the tool.
- Park safely and inspect the diagnostic connector.
- Confirm that the scanner supports the vehicle and required modules.
- Read stored, pending, and permanent codes.
- Save freeze-frame data and useful live readings.
- Interpret the code with the vehicle symptoms and service information.
- Inspect and test likely causes before replacing components.
- Do not clear codes until the original evidence is recorded.
- Verify the repair with a suitable test drive and follow-up scan.
- Use a qualified technician when the fault involves safety, complex electronics, or specialised testing.
An OBD2 scanner is most effective when you treat it as a diagnostic guide rather than a crystal ball. It can reveal valuable information quickly, but accurate repair decisions require context, testing, and attention to safety. By recording the evidence, checking simple causes first, and confirming the result after repairs, you can make better maintenance decisions and communicate more clearly with a professional technician.