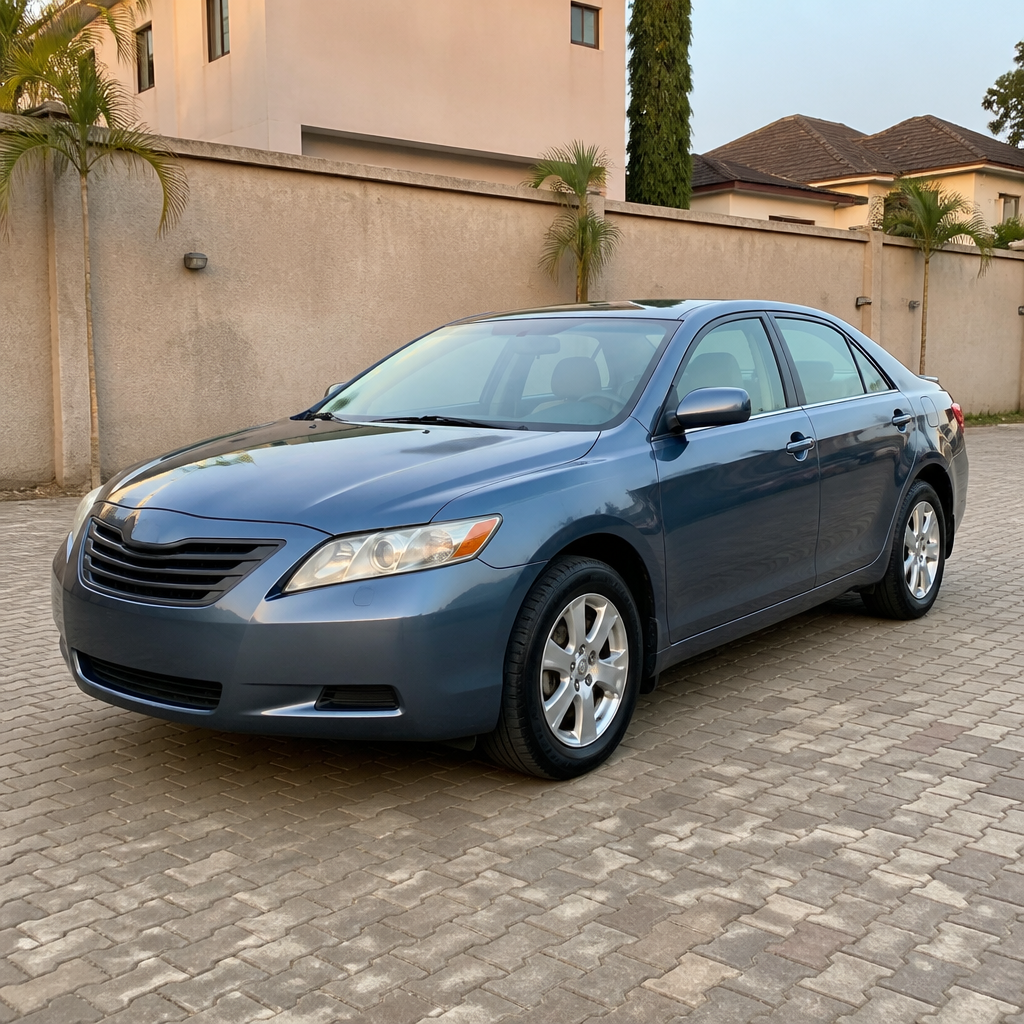
Taking better car photos for sale can make your online listing clearer, more trustworthy and more attractive to serious buyers. Good pictures help people understand the vehicle before they contact you. They also reduce repeated questions, reveal the car’s real condition and give potential buyers a better reason to arrange an inspection.
However, you do not need an expensive camera or professional studio. A clean car, suitable light, a steady phone and a simple plan can produce excellent results. The aim is not to make the vehicle look unrealistically perfect. Instead, your photos should present it accurately, show its strengths and disclose anything a buyer would reasonably want to know.
Why quality car photos matter when selling online
Online buyers usually see photographs before they read every line of a description. If the first image is dark, blurry or poorly framed, they may move to another listing. Even a mechanically sound vehicle can appear neglected when its presentation is careless. How to Choose a Reliable Car Dealer in Nigeria
Strong photos communicate several useful things at once. They show that you have taken time to prepare the car, that you are willing to be transparent and that you understand what buyers need to see. Those signals can improve the quality of enquiries you receive.
Pictures also give buyers an early opportunity to check whether the vehicle suits their needs. They can see the body style, colour, interior layout, boot space, tyre condition and visible wear. As a result, people who contact you are more likely to be genuinely interested.
Good images cannot replace an inspection, a road test or proper document checks. They should support an honest listing, not hide faults. Avoid filters, excessive retouching and angles that deliberately conceal damage. A buyer who feels misled may lose trust before the conversation develops.
Prepare the vehicle before taking pictures
The best camera cannot rescue a car covered in dust, rubbish or fingerprints. Preparation makes the vehicle easier to inspect and gives every image a cleaner appearance.
Clean the exterior properly
Wash the bodywork and remove mud from the lower doors, wheel arches and bumpers. Dry the car so that water spots do not appear on the paint. Clean the windows inside and outside, because dirty glass can make the cabin look darker than it is.
Remove temporary items from the roof, boot and doors. Take off loose stickers that are not part of the vehicle’s normal appearance. If a sticker, wrap or accessory will remain with the car, show it honestly in at least one photograph.
Clean the wheels and tyres without making them look artificially glossy. A small amount of normal tyre dressing can improve presentation, but do not use a product that creates a distracting wet shine. Buyers still need to see the tread and sidewalls clearly.
Organise the interior
Remove bottles, clothing, chargers, papers and personal belongings. Empty the door pockets, centre console, cup holders and boot. If the car has floor mats, clean them and place them correctly.
Wipe the dashboard, steering wheel, door trims and centre console. Be careful with screens and glossy surfaces, as harsh cleaners can leave marks. Do not cover worn upholstery with blankets or objects. If there is a tear, stain or cracked trim, photograph it clearly rather than hiding it.
Open the boot and show its usable space. If the vehicle includes a spare wheel, tool kit, charging cable or parcel shelf, place those items neatly where buyers can see them. Optional equipment can add value, but only when the listing makes its presence clear.
Complete important checks before the shoot
Make sure the number plate is fitted correctly and that the car is parked safely. Check that doors, windows and the boot can open for the photographs. If you plan to show the engine bay, allow the engine to cool before opening the bonnet and working around it.
Do not disconnect safety systems, remove warning stickers or alter the vehicle simply to improve a photograph. If a warning light is visible on the dashboard, do not erase it for the shoot. Buyers deserve an accurate view of the car’s condition.
Choose the right location and time
Your surroundings affect how buyers perceive the vehicle. A calm, uncluttered location keeps attention on the car. A busy roadside, crowded driveway or dark garage can make even a clean vehicle look unappealing.
Look for a safe, legal place with enough room to walk around the car. A quiet driveway, open parking area or clean compound may work well. Avoid blocking traffic, parking in a dangerous position or taking photos where pedestrians and other vehicles create a safety risk.
Choose a simple background. Plain walls, open space and tidy greenery are usually better than piles of rubbish, construction materials or busy commercial signs. The background does not need to look luxurious. It only needs to be clean, safe and less distracting than the vehicle.
Use soft natural light
Bright midday sunlight often creates hard shadows on the bonnet, roof and side panels. It can also make the dashboard look very dark. Better conditions often occur in the morning, late afternoon or on a bright but overcast day.
Cloudy weather can provide even light across the bodywork. This makes dents, colour differences and panel lines easier to see without strong glare. If you photograph in direct sun, keep the sun behind you or slightly to one side. Check the screen for reflections before pressing the shutter.
Do not place the car directly under a tree if falling leaves, patchy shadows or sap may affect the images. Also avoid mixed lighting, such as a car partly inside a garage and partly outside. That can create confusing colours and dark sections.
Use your phone more effectively
Most modern smartphones can take suitable listing photographs when used carefully. Before you begin, clean the camera lens with a soft cloth. A small fingerprint can create haze, glare and reduced detail across the entire image.
Use the main rear camera rather than the front-facing camera. The rear camera generally offers better detail. Hold the phone horizontally for most exterior photographs because landscape images fit many listing layouts better.
Keep the lens at a normal distance when possible. Extreme wide-angle settings can make the front of the car look oversized and distort the body. They may also make a small parking area appear larger than it is. Step back instead, then use a modest amount of cropping if necessary. Car Dealer Questions Before Paying a Deposit
Tap the screen on the vehicle to set focus. If the phone allows exposure adjustment, lower it slightly when bright paint or chrome appears washed out. Take a test image and inspect it before continuing. A photograph that looks acceptable in a small preview may be blurry or overexposed when enlarged.
Keep the camera level
Hold the phone at roughly chest height for a balanced three-quarter view. Keep vertical lines, such as a wall or building edge, as straight as possible. Tilting the phone can make the car appear to lean or make the horizon look distracting.
Use the grid option if your phone provides one. The grid helps you keep the vehicle level and position it consistently. It also makes it easier to place the car slightly off-centre while leaving space in the direction it faces.
Avoid digital zoom. It often reduces detail and makes the image look soft. Move your feet instead, provided you can do so safely. If you must crop, start with a high-resolution original and retain enough space around the vehicle.
Plan a complete set of car photos for sale
A listing should include more than one attractive front angle. Buyers need a practical visual tour of the vehicle. Plan the sequence before you start, and take more photographs than you expect to publish. You can select the strongest images later.
Begin with a clean hero image. This is usually a front three-quarter angle showing the front and one side. Park the wheels straight unless the wheel design looks better with a slight turn. Keep the entire car inside the frame, including the tyres and roof.
Then photograph the main exterior views:
- Front view, showing the grille, headlights and bumper.
- Rear view, showing the tailgate or boot, lights and rear bumper.
- Left side and right side profiles.
- Opposite three-quarter angles from the front and rear.
- Roof, if it has a sunroof, roof rails or visible damage.
- Wheels and tyres, including tread where it can be seen clearly.
- Close views of badges, lights, mirrors and important accessories.
Keep your distance and camera height similar across the exterior set. Consistency helps buyers compare both sides. If one side has more scratches, dents or paint differences, show it directly instead of relying only on a distant angle.
Show the interior from useful positions
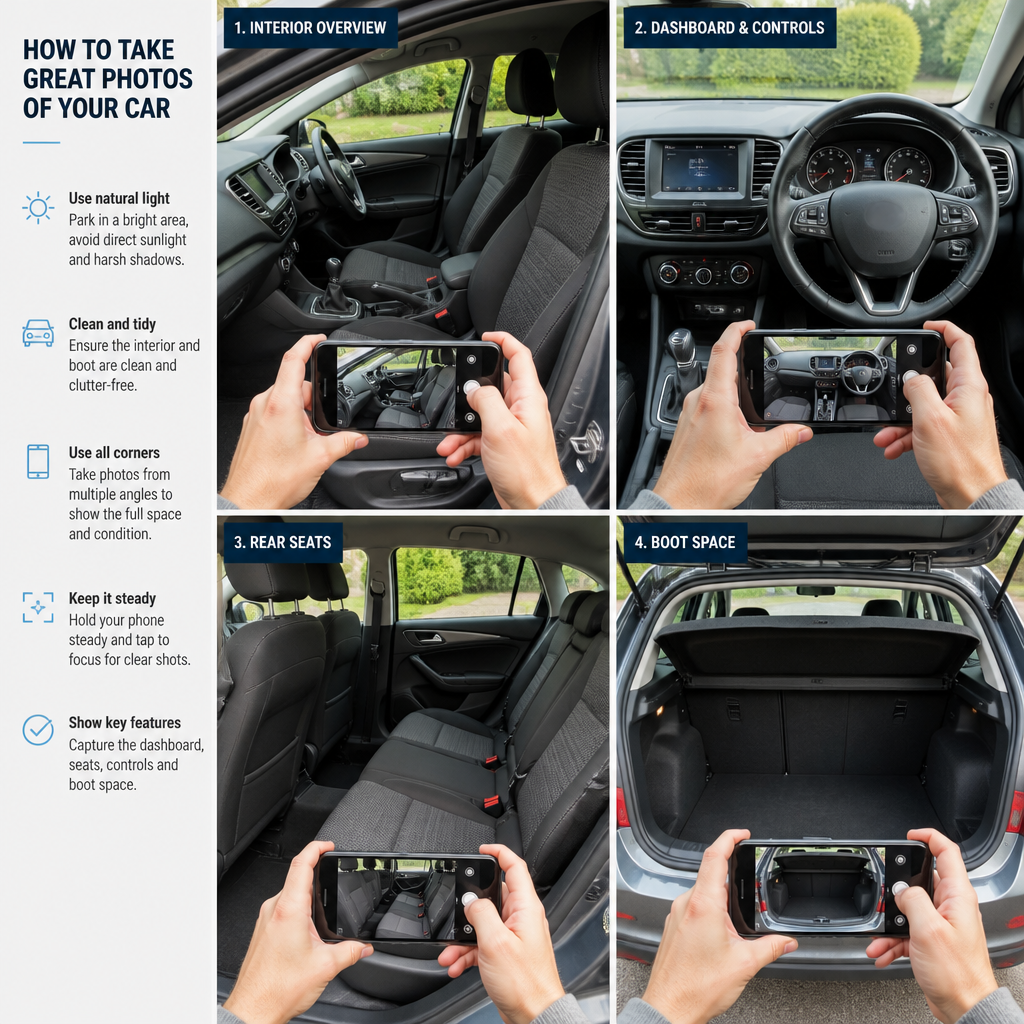
Take one photograph from outside each front door, aiming across the dashboard and front seats. Then show the rear seating area from both sides if space allows. Buyers should be able to judge the upholstery, legroom, door panels and general cleanliness.
Photograph the dashboard with the ignition switched on only when it is safe and appropriate. A clear dashboard image can show the instrument display, mileage and warning lights. Do not take a dashboard photograph while driving, and do not place yourself or anyone else in danger to capture it.
Show the infotainment screen, air-conditioning controls, steering wheel, gear selector and centre console. If the vehicle has a reversing camera or other equipment, photograph the system when it is operating. Avoid using a screen image that hides cracks, dead pixels or error messages.
Take a separate photograph of the boot or cargo area. Open the boot fully and stand far enough away to show its depth. Include the spare wheel, tools or charging equipment when those items are included in the sale.
Photograph the details buyers often ask about
Small details can answer questions before a buyer sends a message. Photograph the tyre tread, wheel condition, key fobs, service book if available, and any included accessories. If the vehicle has two keys, show both without exposing private information on attached tags.
Show the engine bay if it is clean and safe to access. Take the image from above or from a position that presents the main components without touching hot or moving parts. Do not use heavy cleaning products that could damage electrical components or create a misleading appearance.
Also photograph known imperfections. Useful examples include:
- Scratches, dents or paint chips.
- Cracked lamps, damaged mirrors or broken trim.
- Kerbed wheels and worn tyre edges.
- Stains, tears or burns on seats and carpets.
- Rust, corrosion or paint bubbling.
- Dashboard warning lights or damaged displays.
- Wear on the steering wheel, pedals and gear selector.
- Small windscreen chips or cracks.
Use one wider photograph to show where the fault is located and one closer image to show its size. Buyers can then understand both the defect and its context. Honesty does not make a listing weaker. It helps filter out unsuitable enquiries and supports a more productive inspection.
How to take better car photos for sale without misleading buyers
The purpose of car photos for sale is to present the vehicle clearly, not to create an unrealistic impression. You can improve lighting, composition and cleanliness while still showing the car truthfully.
Use ordinary editing tools to crop excess background, straighten the image and adjust brightness slightly. Correct colour only enough to make the photograph resemble the real vehicle. A dark blue car should not become black, and a silver car should not become bright white because of aggressive editing.
Avoid beauty filters, artificial reflections and digital removal of scratches. Do not blur the number plate if the platform or your privacy preference requires it, then accidentally leave another plate visible in a different photograph. Choose one consistent approach and check every image before publishing.
Be careful with wide-angle lenses and low camera positions. They can make the car look larger or more dramatic, but they may also distort its proportions. An honest listing should help a buyer recognise the vehicle when they see it in person. How to Price a Used Car for Sale in Nigeria
Decide what to do with number plates
Some sellers choose to obscure registration numbers in online photographs for privacy. Others leave them visible so buyers can compare the vehicle with documents or checks. The right choice can depend on your location, the selling platform and your privacy concerns.
If you obscure a number plate, use a solid, consistent blur or block. Do not cover other important information, such as a manufacturer label or vehicle identification marking, unless you have a clear privacy reason. Never edit a plate to display a different registration.
Keep the original, unedited photographs for your own records. If a buyer asks for a clearer image during a serious enquiry, decide what information is safe to share and use a secure method. Avoid posting documents that expose unnecessary personal details.
Take photographs that support trust
Trust grows when the pictures, description and vehicle condition agree. If the advert says the car has a clean interior, the interior photographs should support that statement. If the vehicle has been repainted or repaired, explain it rather than using angles that hide the work.
Show the car in its current condition. Do not use old photographs from before an accident, a repair or a change in mileage. If you make a significant improvement after taking the pictures, update the images so the listing stays accurate.
Use the same vehicle throughout the set. This sounds obvious, but stock photographs, images from a previous owner or pictures of a similar trim level can confuse buyers. Do not use manufacturer photographs to represent a used vehicle’s actual condition.
If accessories are not included, do not photograph them in a way that suggests they come with the car. For example, remove a roof box or special audio equipment before the main shoot, or state clearly that it is excluded. Clear wording prevents disappointment later.
Select and arrange the final images
After the shoot, review every photograph on a larger screen if possible. Remove images that are blurry, duplicated, badly exposed or cluttered. Do not publish twenty versions of the same angle while leaving out the engine bay, boot or less attractive side.
Your first image should be your strongest overall view. It should show the car clearly and make the listing easy to recognise. The next images can follow a logical walk-around sequence, moving from the exterior to the interior, equipment and disclosed faults.
A practical order might look like this:
- Front three-quarter hero image.
- Opposite front three-quarter view.
- Side profiles and rear views.
- Wheels, tyres, lights and other exterior details.
- Dashboard and front cabin.
- Rear seats and door panels.
- Boot or cargo area.
- Engine bay and included equipment.
- Clear photographs of any imperfections.
Check that every image has the correct orientation. Rotate sideways pictures before uploading them. Keep the resolution high enough for detail, but follow the selling platform’s file-size and format requirements. If the platform compresses images, begin with clear originals rather than tiny files.
Use useful filenames and captions
When a platform allows filenames or captions, use descriptive wording. A filename such as 2018-toyota-corolla-front-interior.jpg is more useful than a camera-generated sequence of letters and numbers. The filename does not replace an accurate description, but it helps you organise the set.
Captions can identify useful details, such as “rear seats with fold-down centre armrest” or “light scratch on passenger-side rear door.” Keep captions factual and short. Do not use captions to make unsupported claims about the car’s history or mechanical condition.
Good image organisation also helps when you post the vehicle on more than one platform. Keep a folder containing the original images, edited copies, a written description and any records you are comfortable sharing with genuine buyers.
Common photo mistakes that weaken a car listing
Many poor listings fail because of simple presentation problems. Avoid these mistakes before publishing:
- Using only one picture: One angle cannot show the full condition of a vehicle.
- Taking every photograph at night: Artificial light often hides scratches, colour differences and interior wear.
- Leaving rubbish in the cabin: Clutter makes buyers wonder how the car was treated.
- Cutting off the tyres or roof: The frame should include the complete vehicle.
- Standing too close with a wide lens: This can distort the shape and proportions.
- Photographing through a dirty window: Reflections and dust reduce detail.
- Hiding the damaged side: Buyers may assume there are more serious undisclosed issues.
- Using excessive filters: The car may look different in person.
- Showing private documents: Papers can reveal addresses, signatures or account details.
- Including unsafe scenes: Never photograph while driving or place yourself in traffic.
Another common mistake is taking photographs before completing basic cleaning. You may later notice a dirty mat or personal item and need to repeat the entire shoot. A short preparation checklist saves time.
Safety and privacy during the photo session
Choose a safe location and remain aware of traffic, people and your surroundings. Do not stand in the road to capture a dramatic angle. If you need to move the car, check the area carefully and ask another adult to guide you where appropriate.
Do not photograph children, neighbours, house numbers or private paperwork in the background. Check mirrors, windows and reflective paint for accidental reflections of people or personal information. Crop or retake the image when necessary. How to Verify a Vehicle’s VIN Before Buying in Nigeria
Protect keys, registration documents and service records. Photographing a document can expose a vehicle identification number, address or other details that you may not want to publish publicly. Share only information needed for a genuine transaction, and follow the selling platform’s safety guidance.
Be cautious when arranging an inspection after the listing goes live. Meet in a sensible public place when practical, tell someone where you are going and do not hand over keys or documents without a clear reason. Quality images attract interest, but normal precautions still matter.
Match the photographs with a strong vehicle description
Images work best when the written advert gives buyers the context they cannot see. State the make, model, variant, approximate mileage, transmission, fuel type and location accurately. Include notable equipment, service information and the reason for sale only when those details are true.
Describe visible faults in the same straightforward language used in the photographs. For example, say that there is a small dent on the rear door rather than writing that the car is “perfect.” Avoid absolute claims about mechanical condition unless you have reliable evidence to support them.
Make clear whether the displayed price includes all listed accessories and whether any known work remains. Requirements for vehicle documents, ownership transfer and roadworthiness can vary by location. Check the applicable local process before completing a sale, and do not suggest that photographs replace those checks.
When buyers ask questions, answer consistently with the listing. If you do not know the answer, say so and offer to verify it. A careful response is better than a confident but inaccurate claim.
A simple 30-minute workflow
You can create a useful image set without turning the process into a full-day project. The following workflow works well for many private sellers:
- Prepare for five minutes: Remove clutter, clean the lens and check the battery.
- Choose the location: Find a safe, open and uncluttered space.
- Take exterior views: Capture the front, rear, both sides and four three-quarter angles.
- Open the vehicle: Photograph the cabin, dashboard, rear seats and boot.
- Capture details: Show wheels, tyres, equipment and the engine bay when safe.
- Document imperfections: Photograph every visible issue a buyer should know about.
- Review the set: Check focus, exposure, privacy and consistency.
- Edit lightly: Crop, straighten and correct brightness without changing the vehicle.
- Arrange the listing: Put the strongest image first and follow a logical sequence.
Take two or three versions of important angles. A person may walk through the background, a reflection may appear on the glass or the camera may focus on the wrong point. Extra options make the final selection easier.
Frequently asked questions about car photos for sale
How many photos should I include in an online car listing?
Include enough images to show the vehicle from all sides, inside and outside, along with important equipment and known imperfections. The ideal number depends on the platform and the vehicle, but completeness matters more than a fixed target. Avoid repetitive photographs that add no new information.
Should I take pictures with the engine running?
You can show the dashboard with the ignition on if it is safe and useful, but do not photograph while driving. For an engine-bay image, the engine should be cool enough to open the bonnet safely. Never place hands, clothing or phone equipment near moving belts, fans or hot components.
Is it better to photograph a car in direct sunlight?
Not usually. Strong sunlight can create harsh shadows and glare. Soft morning light, late-day light or bright overcast conditions often reveal the vehicle more evenly. If direct sunlight is your only option, change your position and check the screen for reflections.
Should I hide scratches in the photographs?
No. Photograph scratches, dents and other meaningful defects clearly. You can still present the car attractively, but hiding damage wastes your time and the buyer’s time. Honest images encourage more realistic enquiries and make the inspection process smoother.
Can I use old dealer or manufacturer images?
Use current photographs of the actual vehicle whenever possible. Stock images may show different wheels, colours, trim levels or equipment. They do not show the present mileage or condition, so they should not replace real listing photographs.
Should I include the registration number?
That decision depends on your privacy preference, the platform and local practice. If you obscure it, do so consistently and avoid altering any number. Keep original files privately, and do not publish documents containing unnecessary personal information.
What should I do if the car looks a different colour in every photograph?
Mixed lighting, automatic camera settings and strong reflections can change colour. Photograph the car in one session under consistent light, clean the lens and avoid heavy filters. Use mild colour correction only when it helps the image resemble the real vehicle.
Final checklist before publishing
Before you publish the advert, review both the images and the wording. The listing should help a buyer decide whether the vehicle is worth inspecting.
- Is the first image sharp, bright and easy to understand?
- Can buyers see the front, rear, both sides and roof where relevant?
- Are the interior, dashboard, boot and important equipment visible?
- Have you shown wheels, tyres and known imperfections?
- Do the photographs show the current vehicle rather than an older condition?
- Have you removed personal belongings and private information?
- Does the written description agree with every photograph?
- Have you avoided filters or edits that change the vehicle’s appearance?
- Are all images correctly rotated and arranged in a useful order?
- Is the location and any stated vehicle information accurate?
The strongest online listings combine clear photographs, honest descriptions and sensible buyer communication. You do not need a studio, expensive equipment or complicated editing. Clean the vehicle, use soft light, keep the camera steady and show the details that matter. When buyers can see the car clearly, they can make better decisions, and you are more likely to receive serious enquiries.
2 thoughts on “How to Take Better Car Photos for Sale Online”