Learning how to check brake fluid helps you identify a low level, contamination, or a possible hydraulic problem before braking becomes unsafe. The inspection is usually quick, but it should never replace a proper brake examination. Brake fluid transfers pressure from the brake pedal to the calipers or wheel cylinders. If the fluid is low, leaking, contaminated, or incorrect for the vehicle, stopping performance may suffer.
This guide explains how to inspect the reservoir safely, what the fluid should look like, which warning signs require immediate attention, and when you should stop driving. It also covers common mistakes, maintenance intervals, and the differences between a simple low-fluid situation and a serious brake-system fault.
Why brake fluid matters
Most modern vehicles use a hydraulic braking system. When you press the brake pedal, the master cylinder pushes brake fluid through sealed lines. That pressure moves the brake calipers or wheel cylinders, which press brake pads or shoes against a rotating disc or drum. Failing Car Alternator: Signs and How to Diagnose It
Brake fluid works under high pressure and near hot components. It must remain stable across a wide temperature range. Unlike engine oil, it is not primarily a lubricant. Its main job is to transmit force reliably through the braking system.
Brake fluid also attracts moisture over time. This property is called hygroscopic behaviour. Water can enter through microscopic openings in hoses, seals, and the reservoir vent. It can also enter when the reservoir cap remains open or when a service procedure is performed carelessly.
Moisture lowers the fluid’s boiling point. During repeated braking, especially in heavy traffic, steep areas, or emergency stops, the fluid can become very hot. If it boils, gas bubbles may form. Because gas compresses more easily than liquid, the pedal may feel soft and braking may become less effective.
Fluid level also provides useful information. As brake pads wear, the caliper pistons move farther outward. The reservoir level may gradually fall to compensate. However, a sudden drop can indicate a leak or another fault. Topping up without finding the cause can hide a safety problem.
Before you check brake fluid
Prepare properly before opening or inspecting the reservoir. A few simple precautions protect both you and the vehicle.
- Park on level ground. A slope can make the fluid appear higher or lower than it really is.
- Switch off the engine. Apply the parking brake and place the transmission in Park or in gear.
- Allow the vehicle to cool. You do not need to inspect the system immediately after a long drive. Let the engine bay cool enough for safe handling.
- Keep dirt away. Wipe around the reservoir before removing any cap. Dirt inside the hydraulic system can damage components.
- Use the owner’s manual. Reservoir locations and fluid specifications vary between vehicles.
- Wear eye protection and gloves. Brake fluid can irritate skin and eyes.
- Protect painted surfaces. Brake fluid can damage automotive paint. Clean any spill immediately with plenty of water, following the vehicle maker’s guidance.
Do not rely only on the colour of a fluid container or a label from a previous service. Use the specification stated on the reservoir cap, the owner’s manual, or the manufacturer’s official service information. Common specifications include DOT 3, DOT 4, and DOT 5.1, but they are not automatically interchangeable in every vehicle.
How to check brake fluid step by step
You can often complete a visual inspection in a few minutes. However, do not force a cap, disconnect a hose, or bleed the brakes unless you understand the correct procedure for that vehicle.
1. Find the brake-fluid reservoir
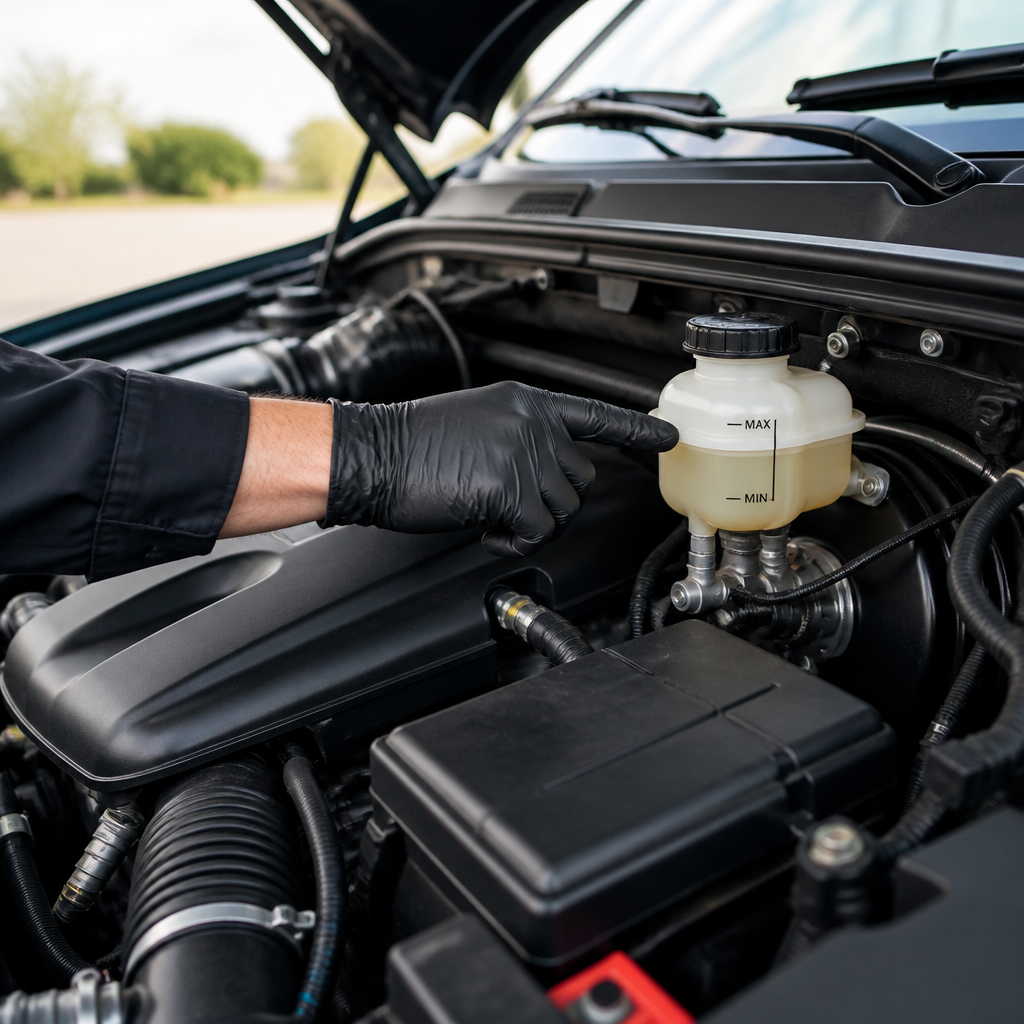
Open the bonnet and look toward the rear of the engine bay, usually near the windscreen or firewall. The reservoir normally sits above the master cylinder. It often has a small translucent plastic container with a dark cap. The cap may carry a brake symbol or wording such as “brake fluid”.
Some vehicles place the reservoir under a cover. Others use a remote reservoir connected to the master cylinder. If you cannot identify it confidently, consult the owner’s manual. Do not open a container simply because it contains a fluid and appears to be in the right area.
2. Inspect the outside first
Look for wetness, dirt stuck to oily residue, cracked plastic, a damaged cap, or fluid around the reservoir seam. Check the area below the reservoir and the master cylinder. Brake fluid may not leave a large puddle, so a damp or shiny area matters.
Follow visible brake lines as far as you can without removing parts. Look for corrosion, wet fittings, damaged hoses, or fluid near the wheels. A wheel-area leak may require removing the wheel for a proper inspection. Do not place any part of your body under a vehicle supported only by a jack.
3. Check the level against the markings
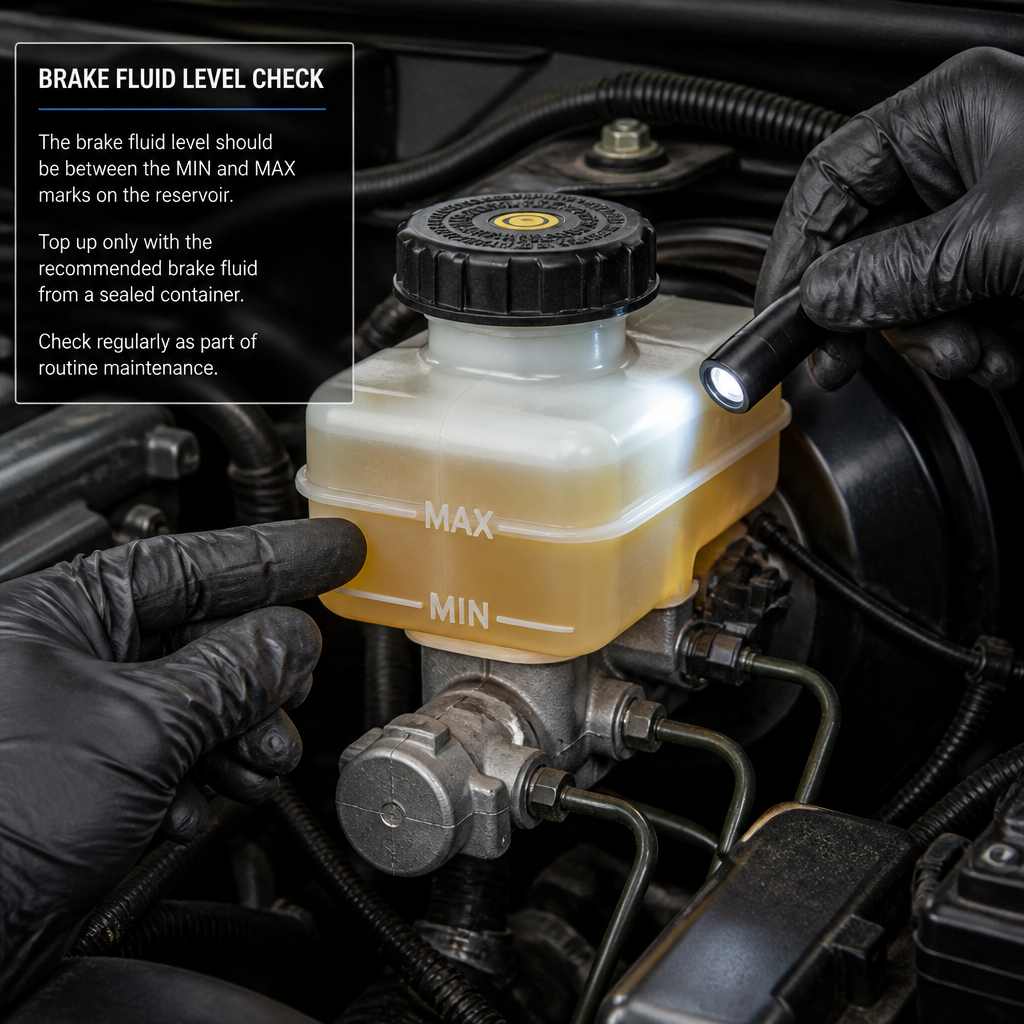
Most reservoirs have “MIN” and “MAX” marks. The fluid should normally sit between them when the vehicle is parked level. Some reservoirs use a line on the side that is difficult to see. Use a torch if necessary, but do not use an open flame near the engine bay.
If the level is close to the lower line, do not assume that adding fluid is always the correct first step. Consider the vehicle’s brake-pad condition and inspect for leaks. A small gradual reduction can occur as friction material wears, but a sudden reduction deserves prompt professional attention.
If the level is below the minimum mark, arrange an inspection before driving any significant distance. If the reservoir is nearly empty, the brake pedal feels abnormal, or a warning lamp is on, do not continue driving. Have the vehicle recovered or inspected where it is safe.
4. Assess the fluid’s appearance
New brake fluid is often clear to light amber, although exact colour varies by specification and product. Used fluid may become darker. Dark fluid alone does not prove that the brakes have failed, but it can indicate age, heat exposure, contamination, or the need for a scheduled fluid change.
Be concerned about visible particles, sludge, cloudiness, oil-like separation, or an unusual colour that does not match the fluid normally used in the vehicle. Do not taste or deliberately touch the fluid. If contamination is suspected, a technician should inspect and flush the system using the correct procedure.
5. Decide whether the cap should be opened
A level check often requires no cap removal because the reservoir is translucent. If you need to open it, first clean the cap and surrounding area. Keep the cap and its seal clean. Never leave the reservoir open longer than necessary.
Some caps contain a float or electronic level sensor. Do not damage it while inspecting the reservoir. If the cap is stuck, seek help rather than using excessive force or tools that could introduce debris.
6. Add fluid only when the specification is confirmed
Use a new, sealed container of the exact fluid specification required by the manufacturer. Brake fluid absorbs moisture from the air after opening, so an old container from a previous repair may no longer be suitable.
Pour slowly and avoid overfilling. The level should remain below the maximum mark. If fluid spills, clean the area promptly. Do not use engine oil, transmission fluid, power-steering fluid, water, or an unverified universal product as a substitute.
Adding fluid may restore the level, but it does not repair worn pads, a leaking line, a damaged master cylinder, or air in the system. If the level dropped for an unknown reason, the vehicle still needs an inspection. When to Change Transmission Fluid: A Practical Guide
7. Close the reservoir and test the pedal
Secure the cap correctly. Then, with the vehicle stationary, press the brake pedal several times. It should feel firm and should not continue sinking while you maintain steady pressure. A small change may occur when the engine starts because of brake assistance, but the pedal should remain controlled and predictable.
Do not test-drive a vehicle simply because the reservoir level looks normal. A normal level cannot confirm that the pads, discs, drums, hoses, calipers, wheel cylinders, and master cylinder are all safe.
Brake fluid warning signs you should not ignore
Brake problems can develop gradually or appear suddenly. Some signs involve the fluid directly, while others indicate a problem elsewhere in the hydraulic or mechanical braking system.
A low or falling reservoir level
A low level may result from normal pad wear, but it can also point to a leak. Check whether the level has changed since your last inspection. If you need to add fluid repeatedly, the vehicle requires diagnosis rather than repeated top-ups.
Brake fluid can leak from a hose, pipe, caliper, wheel cylinder, master cylinder, reservoir, or connection. It may reach a wheel or remain hidden behind a component. A clean driveway does not rule out a leak.
A red brake warning light
A red brake warning lamp may indicate that the parking brake is engaged. If it remains on after releasing the parking brake, the system may detect low fluid, a hydraulic fault, or another problem. Consult the vehicle manual for the meaning of the symbol.
Treat a persistent red brake warning light seriously. Check that the parking brake is fully released, then stop in a safe location. If the lamp stays on, arrange professional assistance before continuing.
An anti-lock brake warning light
An ABS warning light can indicate a sensor, wiring, control-unit, or hydraulic problem. The ordinary hydraulic brakes may still work, but the anti-lock function may not operate correctly during hard braking. Drive only as necessary to reach a safe repair location, and reduce speed.
If the ABS light appears together with the red brake warning light, a soft pedal, or poor braking, stop driving and seek recovery. Several warning lights at once deserve more caution than one isolated indicator.
A soft, spongy, or sinking pedal
A spongy pedal can result from air in the brake lines, moisture-contaminated fluid, a damaged hose, or another hydraulic fault. A pedal that slowly sinks while you hold pressure may indicate internal master-cylinder bypass or a leak.
Do not pump the pedal repeatedly as a substitute for repair. Pumping may temporarily create a firmer feel, but it does not remove the underlying fault. If the pedal feels different from normal, avoid driving until the system has been checked.
A hard pedal with weak braking
A hard pedal can point to a brake-assistance problem, such as a vacuum, hydraulic, or electronic fault, depending on the vehicle. The fluid level may look normal. Because the driver must apply much more force, stopping distances can increase.
Check whether the change occurred after the engine stalled or after starting the vehicle. Do not assume that a hard pedal is harmless. Have the brake-assist system inspected.
Grinding, scraping, or severe squealing
Noise does not always come from brake fluid, but it can indicate worn brake pads, damaged discs, loose parts, or debris. Grinding often means that friction material has worn away. Continuing to drive can damage expensive components and reduce braking performance.
A light squeal can occur for several reasons, including pad material, dust, moisture, or surface corrosion. However, a new, loud, or persistent noise should be investigated, especially when combined with vibration or a warning lamp.
Pulling to one side
If the vehicle pulls left or right during braking, possible causes include a sticking caliper, uneven pad wear, a damaged hose, tyre problems, suspension faults, or uneven braking force. A hydraulic restriction can allow one brake to apply differently from the others.
Do not correct the problem by changing wheel alignment alone. Alignment may matter, but it cannot explain every braking pull. The complete braking system should be examined.
Vibration or pulsation
A pulsating pedal or steering-wheel vibration under braking may be associated with disc thickness variation, runout, wheel problems, suspension wear, or deposits. It is not normally fixed by adding brake fluid.
Vibration that becomes stronger during harder braking deserves prompt attention. It can affect vehicle control and may worsen with heat. What to Do After a Rejected Car Insurance Claim in Nigeria
A burning smell or smoke near a wheel
A hot brake, seized caliper, dragging pad, or parking-brake fault can create a burning smell. Stop safely and allow the vehicle to cool. Do not pour cold water onto hot brake components, because sudden temperature changes can damage parts.
Smoke, strong odour, or a wheel that is noticeably hotter than the others requires professional inspection. Do not touch the wheel or brake assembly with bare hands.
Low brake fluid versus a brake-fluid leak
These conditions are related but not identical. A low reservoir level describes what you observe. A leak describes one possible reason for that condition.
Brake-pad wear can gradually lower the reservoir level because the caliper pistons extend farther. Once new pads are fitted, the pistons move back and the level may rise. This is one reason technicians should inspect the pads before adding a large amount of fluid.
A leak can lower the level quickly. Look for wetness around the master cylinder, reservoir, flexible hoses, metal pipes, calipers, and wheel cylinders. Brake fluid may damage paint and may feel less oily than engine oil, but visual inspection alone cannot always locate it.
If the reservoir is low and the pedal is soft, assume the situation is urgent. Do not drive in busy traffic, on a motorway, or down a steep road to “see whether it improves.” Arrange a qualified inspection.
How often should you check brake fluid?
Include a visual check during routine vehicle maintenance and before a long trip. It is also sensible to inspect the reservoir when you check the engine oil, coolant, tyres, and windscreen-washer fluid. You do not need to open the reservoir every time.
Follow the vehicle manufacturer’s service schedule for fluid replacement. Some manufacturers specify a time interval, a distance interval, or both. Others provide different instructions for different models and operating conditions.
Replacement may be especially important when the vehicle experiences high heat, frequent heavy braking, long periods of storage, humid conditions, or repeated exposure to water. The correct interval depends on the fluid type, vehicle design, climate, and manufacturer guidance.
Do not judge service needs only by fluid colour. A fluid can look acceptable while containing moisture or failing a boiling-point test. Conversely, dark fluid does not by itself identify the exact fault. A workshop can test or replace it using the correct bleeding method and specification.
Choosing the correct brake fluid
Brake fluid specifications are not simply quality grades that can be mixed without thought. DOT 3, DOT 4, and DOT 5.1 fluids are generally glycol-based, while DOT 5 is silicone-based. The vehicle manufacturer’s instructions determine what belongs in the system.
Some glycol-based fluids may be chemically compatible in limited situations, but compatibility does not mean that every vehicle should use them interchangeably. Performance, seal materials, temperature requirements, and electronic brake systems all matter.
Never add silicone DOT 5 to a system designed for glycol-based fluid unless the manufacturer specifically permits that arrangement. Also, do not assume that a product labelled “racing” or “high performance” is suitable for ordinary road use in your vehicle.
Buy from a reputable supplier and check the container for a clear specification, intact seal, and suitable condition. If the label is unreadable or the bottle has been open for a long time, do not use it.
Common mistakes when checking brake fluid
- Checking on a slope: The reservoir level may not represent the true level.
- Opening a dirty reservoir: Dust can enter the hydraulic system and damage valves or seals.
- Adding the wrong fluid: Chemical incompatibility can damage seals and create a serious fault.
- Filling to the top without inspection: Overfilling can cause problems when new pads are installed and the pistons are pushed back.
- Ignoring repeated top-ups: A recurring low level needs diagnosis.
- Relying on colour alone: Fluid appearance is only one part of an inspection.
- Using an old opened bottle: Brake fluid absorbs moisture from air.
- Cleaning spills with a dry cloth only: Protect painted surfaces and follow safe cleaning practices.
- Driving because the vehicle still stops: A brake system can lose safety margin before it stops working completely.
- Working under an unsupported vehicle: Use proper stands and safe lifting procedures.
When you should not drive the vehicle
Stop driving and arrange professional help if the pedal reaches the floor, the reservoir is nearly empty, a red brake warning lamp remains on, or you see active fluid leakage. The same applies when the vehicle needs much more distance to stop or pulls sharply under braking.
Do not drive if brake fluid has contaminated the brake pads or shoes. Friction material may lose effectiveness and cannot always be restored by wiping it clean. The affected components may need replacement.
If the warning is mild and the brakes feel normal, drive only as needed to reach a trusted workshop. Use a low speed, leave extra space, avoid heavy loads, and do not tow. These precautions do not make a defective system safe; they only reduce exposure while you arrange repair.
What a professional brake inspection may include
A technician should begin by confirming the customer’s symptoms and checking the warning lights. The inspection may include the fluid level and condition, reservoir, master cylinder, visible lines, flexible hoses, calipers, wheel cylinders, pads, shoes, discs, drums, parking-brake mechanism, and ABS components. Airbag Warning Light: Causes, Risks and Next Steps
The technician may also test the pedal, inspect for air, measure friction-material thickness, check disc or drum condition, and look for uneven wear. If fluid replacement is required, the system must be bled correctly. Some vehicles need a scan tool or a specific sequence to service the ABS hydraulic unit.
A proper repair should address the cause. For example, replacing fluid without repairing a leaking hose is incomplete. Replacing pads without checking why one side wore faster may allow the original problem to return.
Brake fluid checks when buying a used car
When viewing a used vehicle, include the brake-fluid reservoir in your inspection. Check whether the level sits between the marks and whether the reservoir looks clean and undamaged. Look for signs of leakage around the master cylinder and nearby components.
Then inspect the dashboard before starting the engine. Confirm that the brake and ABS warning lights illuminate during the self-check and go out after the vehicle starts, if that is how the manufacturer designed the system. A missing warning light may indicate a disabled or altered bulb, so the inspection should be thorough.
During a controlled road test, notice pedal firmness, stopping response, pulling, vibration, noise, and warning lights. Test braking only where lawful and safe. Do not perform an emergency stop on a public road merely to evaluate a vehicle.
Ask for service records showing brake repairs and fluid replacement. A seller’s statement that the fluid was “just topped up” does not confirm that the system is healthy. If the level is low or the pedal feels unusual, make the sale conditional on an independent inspection or reconsider the purchase.
Frequently asked questions
Can I check brake fluid while the engine is hot?
You can visually inspect the reservoir, but it is safer to allow the engine bay to cool first. Hot components can cause burns, and opening the reservoir immediately after heavy use is unnecessary. Park safely, switch off the engine, and follow the manufacturer’s instructions.
Can I drive with brake fluid below the minimum mark?
Do not assume it is safe. A low level may indicate worn pads, a leak, or another fault. If the level is below the minimum mark, have the system inspected before normal driving. A nearly empty reservoir or abnormal pedal requires recovery rather than a drive to the workshop.
Does dark brake fluid always mean it must be changed?
Not always, but dark or contaminated-looking fluid deserves attention. Service timing depends on the manufacturer’s schedule, fluid specification, moisture content, vehicle use, and inspection results. A technician can advise whether replacement is due.
Can I mix different brands of the same DOT type?
Brand alone does not determine compatibility, but you should still follow the vehicle manufacturer’s specification. Use a new, sealed product from a reputable supplier. If the existing fluid type is unknown or contamination is suspected, ask a technician to inspect and flush the system correctly.
Why did the brake-fluid level drop after a service?
The level may change if pads were replaced, the system was bled, or a leak developed. Ask the workshop what work was completed. A continuing drop, wetness, or pedal change is not normal and needs prompt inspection.
Is brake fluid the same as power-steering fluid?
No. They are different products with different chemical properties and purposes. Adding power-steering fluid to the brake reservoir can damage seals and create a dangerous braking fault. If the wrong fluid was added, do not drive until a qualified technician has assessed the system.
Can I replace brake fluid myself?
Some experienced vehicle owners can perform a fluid change using the correct equipment and procedure. However, bleeding errors can leave air in the system, and some ABS systems require special steps. If you are unsure, use a qualified technician. Braking work is not a good place to learn through trial and error.
Final safety checklist
Before finishing your inspection, confirm the following:
- The vehicle is parked level, secured, and cool enough to inspect safely.
- You identified the correct reservoir using the owner’s manual.
- The fluid level sits between the manufacturer’s minimum and maximum marks.
- The reservoir, cap, master cylinder, lines, and visible hoses show no obvious leakage.
- The fluid has no obvious particles, sludge, or separation.
- You used only the specified brake-fluid type, if topping up was appropriate.
- The cap is clean and securely fitted.
- The brake pedal feels normal and does not sink under steady pressure.
- No brake or ABS warning light remains on.
- You arranged professional help for any unexplained change.
Knowing how to check brake fluid gives you an early warning system, not a complete brake diagnosis. A normal reservoir level does not guarantee healthy pads, discs, hoses, calipers, or electronic safety systems. Inspect regularly, follow the manufacturer’s service schedule, and treat changes in pedal feel or warning lights as safety issues.
When in doubt, stop driving and ask a qualified brake technician to inspect the vehicle. A short inspection can prevent a small maintenance issue from becoming a loss of braking control.